How to build a real-time streaming UI with Python, FastAPI, and HTMX in less than 200 lines of code.

Summary
- Introduction about HTML and the Web
- A simple HTMX demo
- A basic Chat with HTMX and FastAPI
- A more advanced chat with Streaming and Server-Sent Events
- An agentic chatbot with Gemini and ADK
- Conclusion
Introduction
I remember there was a time, long ago, when building websites was easy. HTML and CSS. It felt simple. Nowadays, Javascript frameworks are everywhere. Relentless change, increasing complexity. This phenomenon is called “Javascript Fatigue” and is all about developers exhausted by chasing the latest frameworks, build tools, libraries, and trying to keep the pace. But with HTMX, developers now have a way to build engaging web applications with greater simplicity and less burnout — and without all the JS hassle.
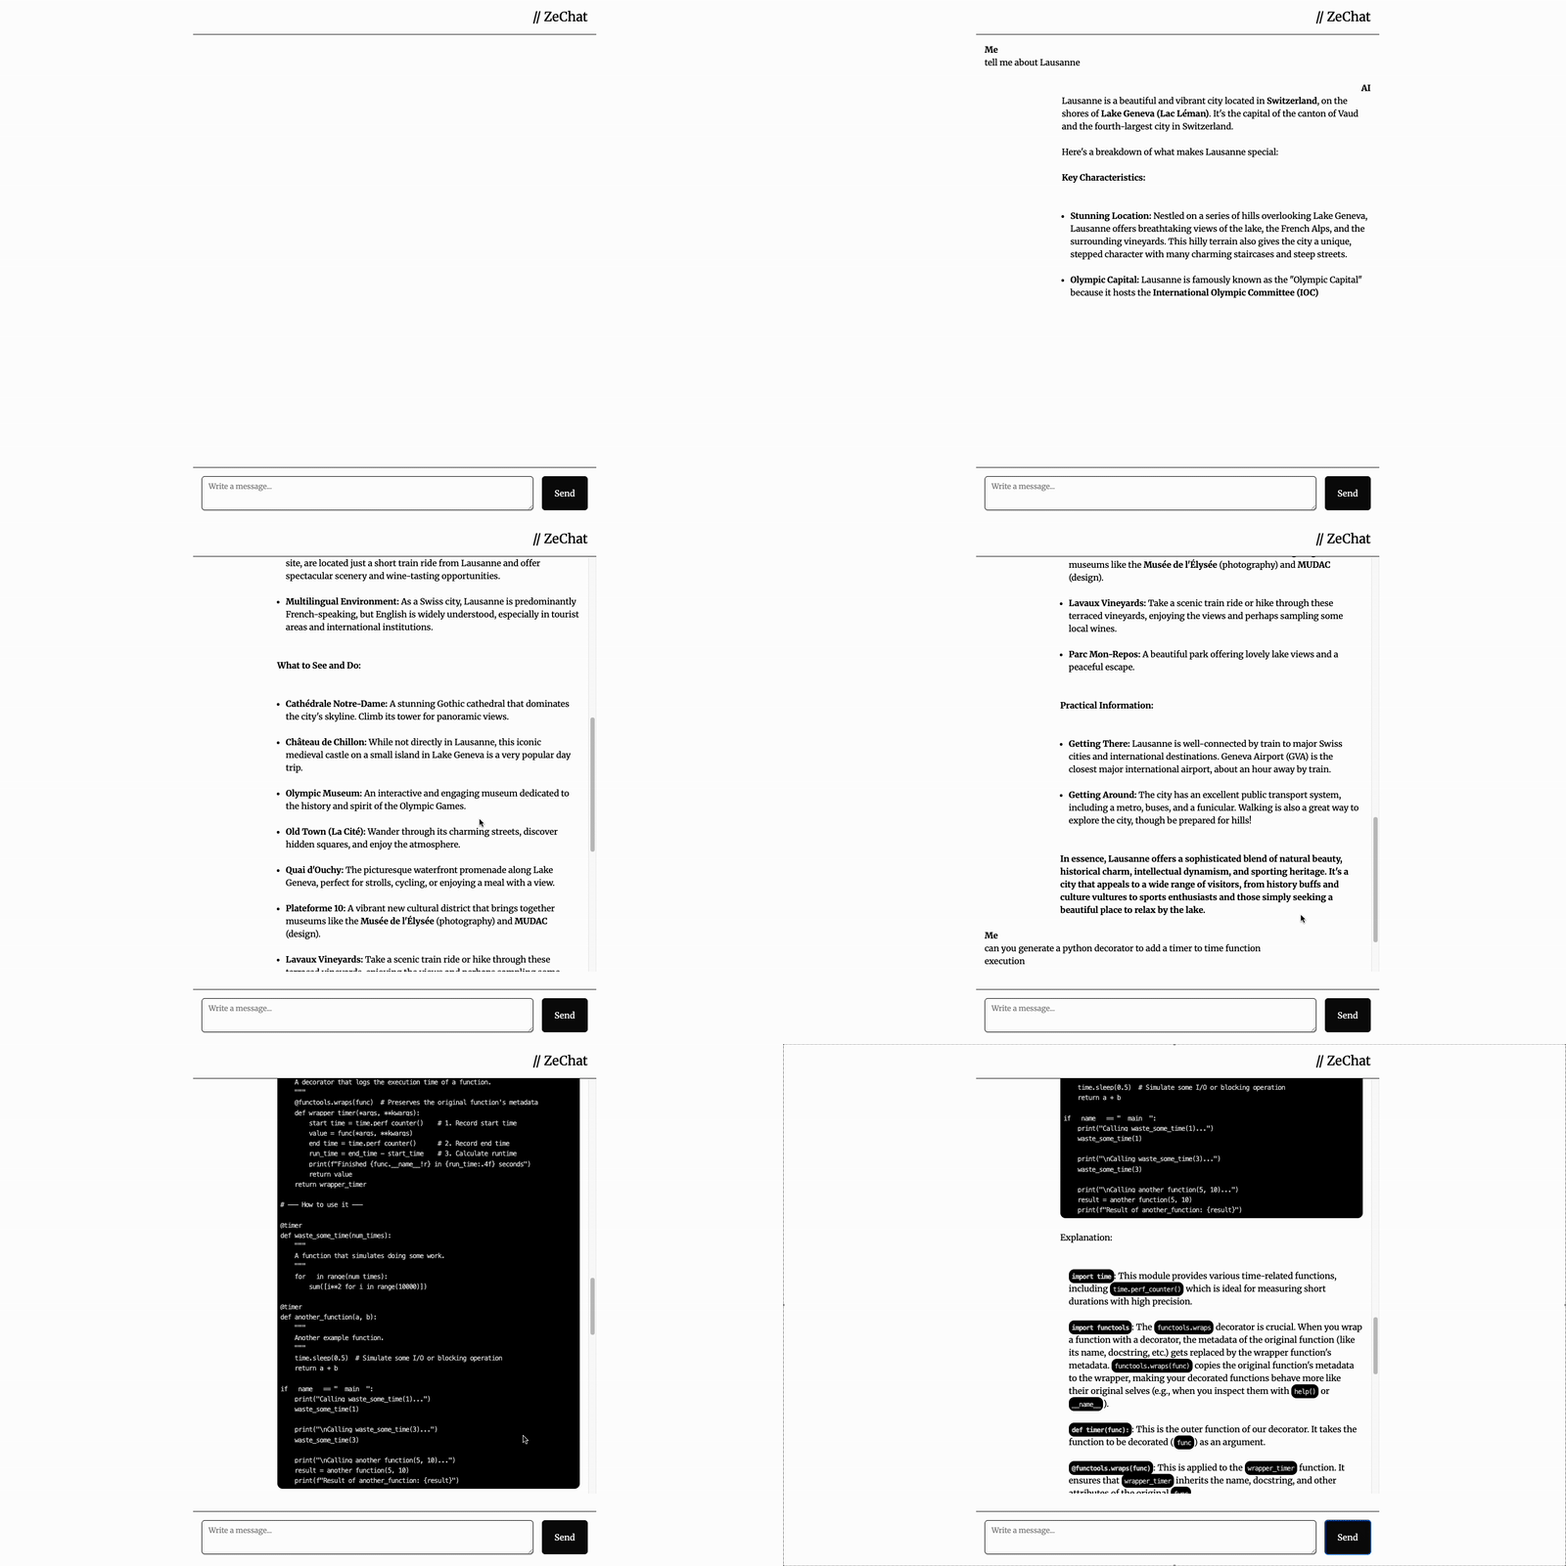
And by engaging web applications, I mean something like ChatGPT, in less than 200 lines of code, pure Python and HTML. Like this one:
A quick refresher on how the Web works
When Tim Berners-Lee created the first web page in 1990, the system he designed was mostly a “read-only” system, that would lead to pages connected between themselves with hyperlinks, which we all know as anchor tags in HTML. HTML 1.0 was therefore relying on one single tag for navigation (there are of course other tags for text structure) and offered simple navigation between pages.
<!-- The original web: simple hypermedia -->
<a href="/about">About Us</a>
The anchor tag is a hypermedia control that does the following process:
- show the user that this is a link (clickable)
- issue a GET request to the hyperlink URL
When the server responds with a new page, the browser will replace the current page with the new page (navigation).
Then came HTML 2.0 which introduced a new tag, the <form> tag. This tag allowed to update ressources in addition to reading them via the <a> tag. Being able to update ressources meant that we could really start building web applications. All of this with only two controls: <form> and <a>.
<!-- HTML 2.0: now we can update data -->
<form method="POST" action="/login">
    <input type="email" name="email" required>
    <input type="password" name="password" required>
    <button type="submit">Login</button>
</form>
The process when submitting a form is quite similar to the anchor tag, except that we can:
- choose which kind of request we want to perform (GET or POST)
- attach user information like email, password, etc. to be passed with the request
The two tags are the only elements, in pure HTML, that can interact with a server.
And then came Javascript
JavaScript was originally created to add simple interactions to web pages: form validation, data fetching, and basic animations. But with the introduction of XMLHttpRequest (later known as AJAX), JavaScript evolved into something much more powerful and complex.
With AJAX, developers could now trigger HTTP requests without the two tags. AJAX allows fetching data from the server, and though XHR can fetch any type of data — including raw HTML fragments, text, or XML — JSON became the de facto data exchange format.
This means there needs to be an additional step where JSON gets converted to HTML, via a function that renders HTML from JSON. As shown in the example below, we proceed by:
- fetching JSON data from the
/api/usersendpoints (theresponse => response.json()part) - inserting this data into a HTML templates (the
const htmlpart) - that will then be added to the DOM (the
document.getElementById()part)
// The JavaScript way: JSON → HTML conversion
fetch('/api/users')
    .then(response => response.json())
    .then(users => {
        const html = users.map(user =>
            `<div class="user">${user.name}</div>`
        ).join('');
        document.getElementById('users').innerHTML = html;
    });
This rendering involves a tight coupling between the JSON data format and the HTML rendering: if the JSON data format changes, it breaks the HTML rendering function. This point is usually a source of friction between frontend and backend developers: frontend dev builds a UI based on an expected JSON format, backend dev decides to change the format, frontend dev needs to update UI, backend dev changes again, frontend dev changes again, etc.
Eventually, the industry pivoted heavily toward JSON-driven architectures, giving rise to Single-Page Applications (SPAs). We stopped building websites that navigated from page to page and started building software that lives entirely inside the browser. In this model, the server is reduced to a simple data API, while JavaScript handles the heavy lifting of state management and UI rendering. This is the engine behind React, Angular, and Vue — powerful, but complex.
Below are some thoughts from an excellent source which I encourage you to read so you can make your mind:
“The emerging norm for web development is to build a React single-page application, with server rendering. The two key elements of this architecture are something like: – The main UI is built & updated in JavaScript using React or something similar. – The backend is an API that that application makes requests against.
This idea has really swept the internet. It started with a few major popular websites and has crept into corners like marketing sites and blogs.”
(…)
But there are also a lot of problems for which I can’t see any concrete benefit to using React. Those are things like blogs, shopping-cart-websites, mostly-CRUD-and-forms-websites.
(…)
I don’t think that everyone’s using the SPA pattern for no reason. For large corporations, it allows teams to work independently: the “frontend engineers” can “consume” “APIs” from teams that probably work in a different language and can only communicate through the hierarchy.”
(Tom MacWright, https://macwright.com/2020/05/10/spa-fatigue)
Javascript Fatigue is real
As the dominance of SPAs grew, so did the number of Javascript frameworks and the complexity associated to it. For developers, this profusion of choices, opinionated frameworks and libraries eventually led to a collective sense of exhaustion called “Javascript Fatigue”. Here are some reasons to this Javascript frameworks burn-out:
- Increasing complexity: Libraries and frameworks have become increasingly heavy and complex, requiring big teams to manage. Some opinionated frameworks also mean that JS developers have to specialize on one tech. No Python developer ever called themself “A Tensorflow Python developer”. They’re just Python developers, and switching from TF to Pytorch is not a problem.
- Tight coupling: The coupling between data APIs and the UI creates friction within teams. Breaking changes occur everyday, and there is no way to solve this as long as teams use JSON as their exchange interface.
- Framework proliferation: The number of frameworks keeps increasing, leading to a real feeling of “fatigue” among JS developers.
- Over-engineering: You don’t need JS-heavy frameworks 90% of the time. And in some cases (content-heavy apps), it is even a bad idea (cf Tom MacWright’s blog post)
Except for highly interactive/collaborative UIs, simple HTML with Multi-Page Applications is often enough. So how do we go back to good old HTML ?
HTMX is All You Need
HTMX is a very lightweight JS library (14k) that offers a HTML-centric approach to building dynamic web applications. It extends HTML by allowing any element to make AJAX requests and update any part of the DOM. Unlike JS frameworks which do all the rendering on the client side, the heavy lifting is done by the server by returning HTML fragments to be inserted in the DOM. This also means that if you already know templating engines and HTML, the learning curve will be much much much easier compared to learning React or Angular.
Instead of abandoning hypermedia for JSON APIs, HTMX makes HTML more capable with the following:
- Any element can make HTTP requests (not just
<a>and<form>) - Any HTTP method (GET, POST, PUT, DELETE, PATCH)
- Any element can be targeted for updates
- Any event can trigger requests (click, submit, load, etc.)
In fact, you can actually write your own little GPT-like UI with HTMX and just a few lines of Python!
A Simple HTMX demo
For this article, we will build a little chat with less than 100 lines of Python and HTML. But before that, we will start with a simple demo to show how HTMX works.
Let’s assume we have an API that returns a list of users. We want to click a button to fetch the data and display a list.

In the traditional, JS-way, one would probably do like below. Notice how in this case we are using vanilla Javascript, and not even installing Next or Vite with their dozens of Mb of dependencies !
<!-- Traditional JavaScript approach -->
And now is the time we look at HTMX. First create your backend with FastAPI (could be Go, PHP, whatever you like. HTMX does not care):
from fastapi import FastAPI, Request
from fastapi.responses import HTMLResponse
from fastapi.templating import Jinja2Templates
import requests

app = FastAPI()
templates = Jinja2Templates(directory="templates")

@app.get("/", response_class=HTMLResponse)
async def home(request: Request):
    return templates.TemplateResponse("demo.html", {"request": request})

@app.get("/users")
async def get_users():
    r = requests.get("https://dummyjson.com/users")
    data = r.json()
    html = ""
    for row in data['users']:
        html += f"<li>{row['firstName']} {row['lastName']}</li>\n"
    return HTMLResponse(html)
And then write a simple HTML page:
<!-- HTMX approach -->
<!DOCTYPE html>
<html>

<head>
  <title>Demo</title>
  <script src="https://cdn.jsdelivr.net/npm/htmx.org@2.0.8/dist/htmx.min.js" integrity="sha384-/TgkGk7p307TH7EXJDuUlgG3Ce1UVolAOFopFekQkkXihi5u/6OCvVKyz1W+idaz" crossorigin="anonymous"></script>
</head>

<body>
  <h1>Users</h1>
   <button hx-get="/users" hx-target="#usersList" hx-swap="innerHTML">Show</button>
  <div>
    <ul id="usersList">
    </ul>
  </div>
</body>
You get exactly the same result! What happened just here? Look at the <button> element. We see 3 attributes starting with hx-. What are they here for?
hx-get: Clicking on this button will trigger a GET request to the/usersendpointhx-target: It tells the browser to replace the content of the element which has theusersListid with the HTML data received from the serverhx-swap: It tells the browser to insert the HTML inside the target element
With that, you already know how to use HTMX. The beautiful thing about this way of doing is that if you decide changing your HTML, it won’t break anything on your page.
There are, of courses, advantages and drawbacks in using HTMX. But as a Python developer, among a team of Python developers, it feels very nice being able to play around with my FastAPI backend and not worry a lot about frontend development. Just add Jinja templates, a dose of Tailwind CSS, and we’re good to go!
Our first chat with HTMX and FastAPI
So now is the moment when things are getting serious. To build our chatbot, we will proceed step by step:
- Start with a a dumb chatbot that will take the users query, and spit it backwards. This will illustrate how HTMX sends and receives data
- Add a streaming capability to our chatbot that will spit out the user’s query word by word, to illustrate Server-Sent Events (SSE) and async communication
- Plug a real LLM with a Google Search tool to get real answers and illustrate the concepts of agentic chatbots
Let’s begin with our dumb chatbot. For that we will design a simple UI that will take:
- a list of messages
- a textarea for the user’s input
And guess what, HTMX will take care of sending/receiving the messages! This is what the result will look like:
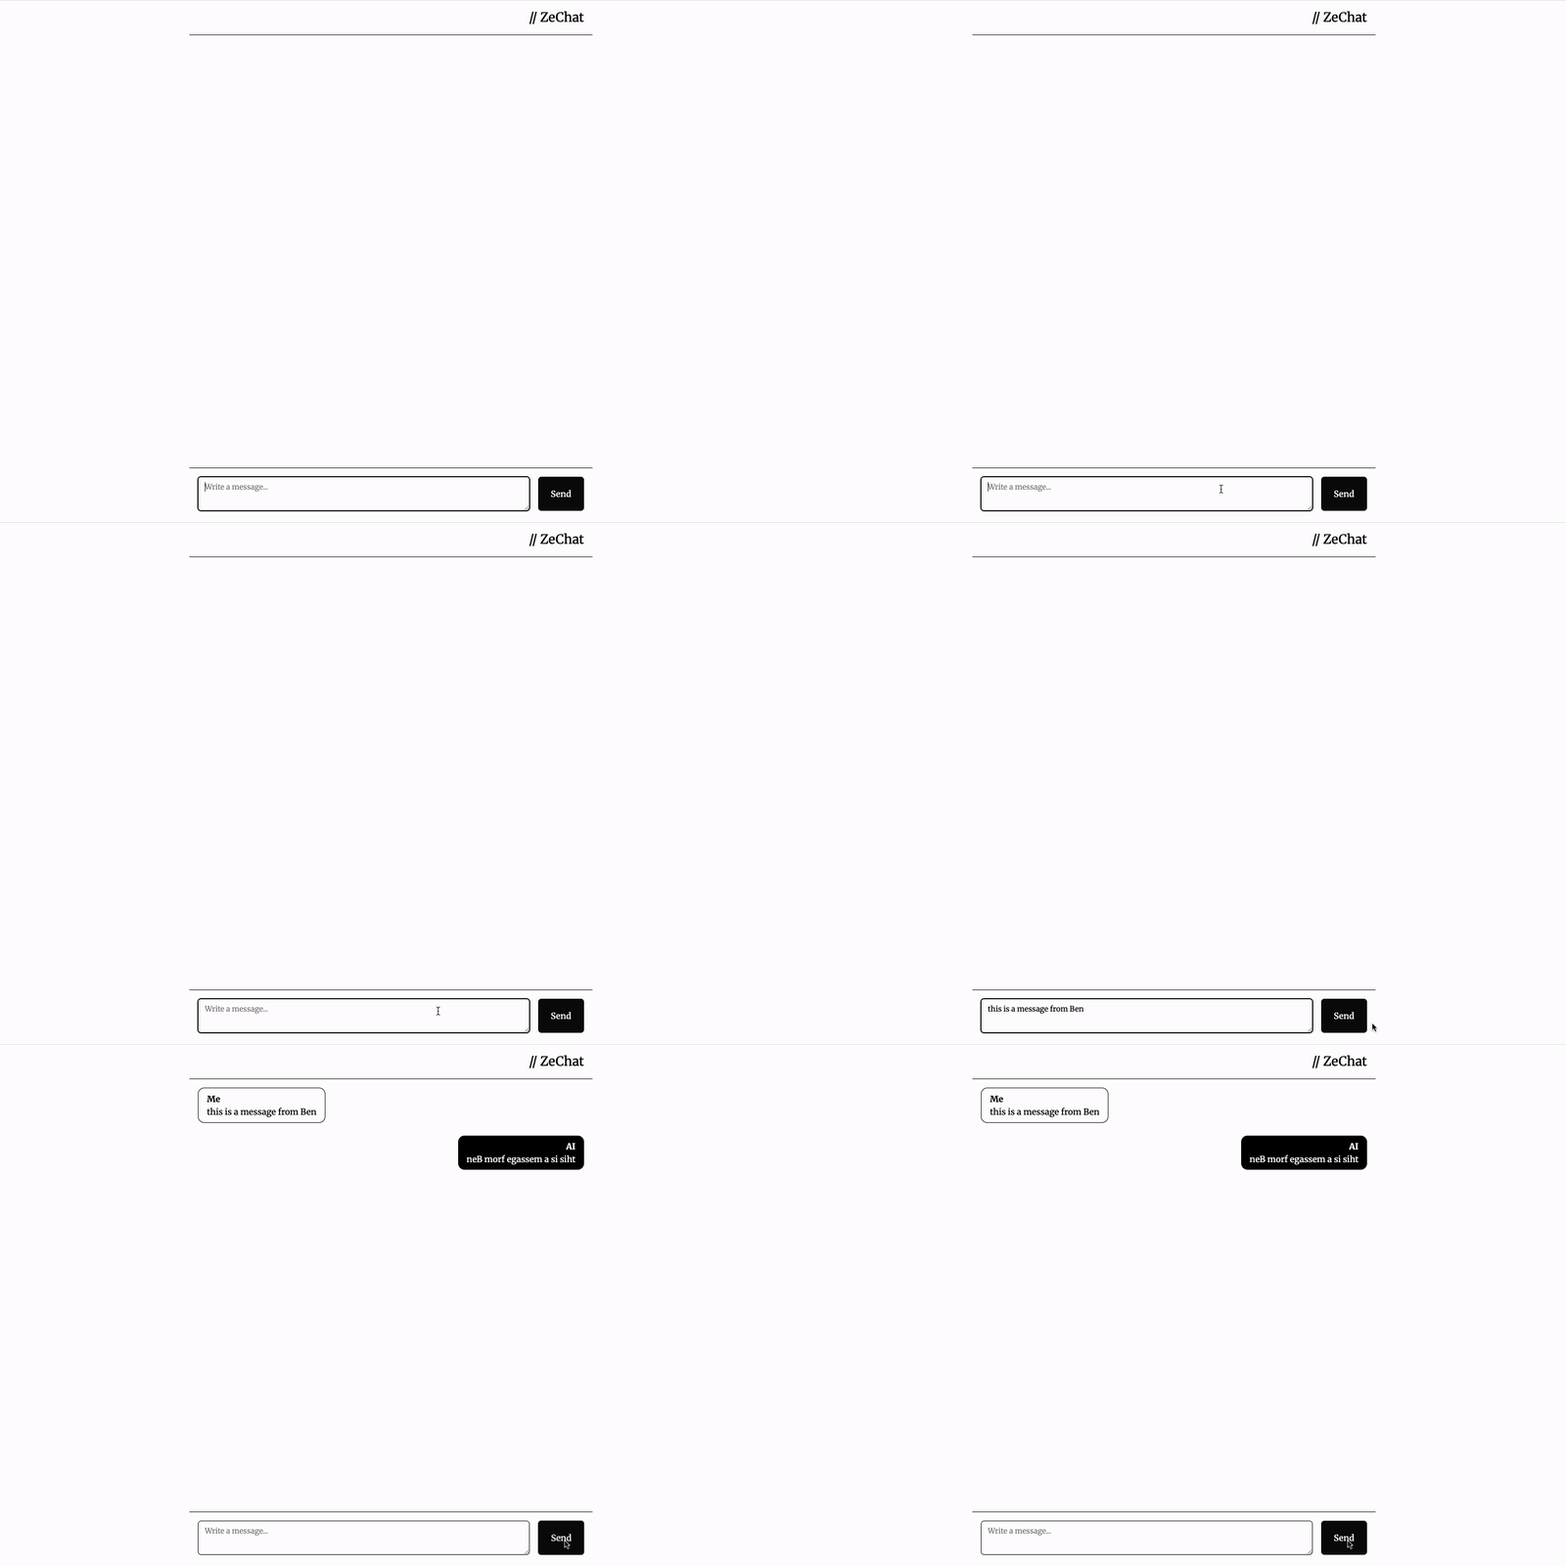
The flow is the following:
- User inputs a query in a textarea
- This textarea is wrapped in a form, which will send a POST request to the server with the
queryparameter. - The backend receives the request, does something with the
query(later on, we will use a LLM to answer the query). To begin with, we will just reply by reverting the query letter by letter. - The backend wraps the response in an HTMLResponse (not JSON!)
- In our form, HTMX tells the browser where to insert the response, as shown in the
hx-target, and how to swap it with the current DOM
And this is all. So let’s begin!
Backend
We will define a /send route that expects a query string from the frontend, inverts it, and sends it back in a <li> tag.
from fastapi import FastAPI, Request, Form
from fastapi.templating import Jinja2Templates
from fastapi.responses import HTMLResponse
import asyncio
import time

app = FastAPI()
templates = Jinja2Templates("templates")

@app.get("/")
async def root(request: Request):
    return templates.TemplateResponse(request, "simple_chat_sync.html")

@app.post("/send")
async def send_message(request: Request, query: str=Form(...)):
    message = "".join(list(query)[::-1])
    html = f"<li class='mb-6 justify-end flex'><div class='max-w-[70%] bg-black text-white rounded-xl px-4 py-2'><div class='font-bold text-right'>AI</div><div>{message}</div></div></li>"
    return HTMLResponse(html)
Frontend
On the frontend side, we define a simple HTML page using Tailwind CSS and HTMX:
<!doctype html>
<html>
<head>
  <meta charset="UTF-8" />
  <meta name="viewport" content="width=device-width, initial-scale=1.0" />
  <script src="https://cdn.jsdelivr.net/npm/@tailwindcss/browser@4"></script>
  <link rel="stylesheet" href="https://cdnjs.cloudflare.com/ajax/libs/highlight.js/11.11.1/styles/default.min.css">
  <script src="https://cdnjs.cloudflare.com/ajax/libs/highlight.js/11.11.1/highlight.min.js"></script>
  <script src="https://cdn.jsdelivr.net/npm/htmx.org@2.0.8/dist/htmx.min.js"
    integrity="sha384-/TgkGk7p307TH7EXJDuUlgG3Ce1UVolAOFopFekQkkXihi5u/6OCvVKyz1W+idaz"
    crossorigin="anonymous"></script>
  <script src="https://cdn.jsdelivr.net/npm/htmx-ext-sse@2.2.4"
    integrity="sha384-A986SAtodyH8eg8x8irJnYUk7i9inVQqYigD6qZ9evobksGNIXfeFvDwLSHcp31N"
    crossorigin="anonymous"></script>
  <link rel="preconnect" href="https://fonts.googleapis.com">
  <link rel="preconnect" href="https://fonts.gstatic.com" crossorigin>
  <link href="https://fonts.googleapis.com/css2?family=Merriweather:wght@300..700&display=swap" rel="stylesheet">
  <style>
    body {
      font-family: "Merriweather";
    }
  </style>
</head>
<body class="flex w-full bg-white h-screen">
  <main class="flex flex-col w-full md:w-3/4 lg:w-1/2 pb-4 justify-between items-left mx-auto ">
    <header class="border-b p-4 text-2xl text-right">
      // ZeChat
    </header>

    <div class="mb-auto max-h-[80%] overflow-auto">
      <ul id="chat" class="rounded-2xl p-4 mb-16 justify-start">
      </ul>
    </div>

    <footer class="p-4 border-t">
      <form id="userInput" class="flex max-h-16 gap-4" hx-post="/send" hx-swap="beforeend" hx-target="#chat"
        hx-trigger="click from:#submitButton" hx-on::before-request="
                htmx.find('#chat').innerHTML += `<li class='mb-6 justify-start flex'><div class='max-w-[70%] border border-black rounded-xl px-4 py-2'><div class='font-bold'>Me</div><div>${htmx.find('#query').value}</div></div></li>`;
                htmx.find('#query').value = '';
                ">
        <textarea id="query" name="query"
          class="flex w-full rounded-md border border-input bg-transparent px-3 py-2 text-sm shadow-sm placeholder:text-muted-foreground focus-visible:outline-none focus-visible:ring-1 focus-visible:ring-ring disabled:cursor-not-allowed disabled:opacity-50 min-h-[44px] max-h-[200px]"
          placeholder="Write a message..." rows="4"></textarea>
        <button type="submit" id="submitButton"
          class="inline-flex max-h-16 items-center justify-center rounded-md bg-neutral-950 px-6 font-medium text-neutral-50 transition active:scale-110">Send</button>
      </form>
    </footer>
  </main>
</body>
</html>
Let’s have a closer look the <form> tag. This tag has several attributes, so let’s take a minute to review them:
hx-post="/send": It will make a POST request to the/sendendpoint.hx-trigger="click from:#submitButton": This means the request will be triggered when thesubmitButtonis clickedhx-target="#chat": This tells the browser where to put the HTML response. In that case, we want the response to be appended to the list.hx-swap="beforeend": The hx-target tells where to put the content, the hx-swap tells HOW. In that case, we want the content to be added before the end (so after the last child)
The hx-on::before-request is a little bit more complex, but can be explained easily. It basically happens between the click and the moment the request is sent. It will add the user input the bottom of the list, and clear the user input. This way, we get a snappy user experience!
A Better chat with Streaming and SSE
What we built is a very simple yet functional chat, however if we want to plug a LLM, we might find some moments when the response from the server takes a long time to be returned. The way our current chat is built is synchronous, meaning nothing will show until the LLM is finished writing. Not a great user experience.
What we need now is streaming, and a real LLM to have a conversation with. Here are the next steps :
- Real-time streaming with SSE
- Session-based architecture for multiple users
- Async coordination with
asyncio.Queue - Clean HTMX patterns with dedicated SSE handling
- A Google Search Agent to answer queries with fresh data
Here is what the final result will look like:
From sync communication to async
What we built previously leveraged very basic web functionalities leveraging forms. Our communication was synchronous, meaning we don’t get anything until the server is done. We issue a request, we wait for the full response, and we display it. Between the two, we just…wait.
But modern chatbots work differently, by providing asynchronous communication capabilities. This is done using streaming: we get updates and partial responses instead of waiting for the full response. This is particularly helpful when the response process takes time, which is typically the case for LLMs when the answer is large.
SSE vs Websockets
SSE (Server-sent Events) and Websockets are two real-time data exchanges protocols between a client and a server.
Websockets allows for full-duplex connections: this means the browser and the server can both send and receive data simultaneously. This is typically used in online gaming, chat applications, and collaborative tools (think Google Sheets).
SSE are unidirectional and only allow for a one-way conversation, from server to client. This means that the client cannot send anything to the server via this protocol. If websockets is a two-way phone conversation where people can speak and listen at the same time, SSE is like listening to the radio. SSE are typically used to send notifications, update charts in finance applications, or newsfeeds.
So why do we choose SSE? Well because in our use case we don’t need full duplex, and that simple HTTP (which is not how Websockets work) is enough for our use case : we send data, we receive data. SSE means that we will receive data in a stream, nothing more is needed.
Overview
Here is the flow we will build:
- User inputs a query
- Server receives the query and sends it to the LLM
- LLM starts producing content
- For each piece of content, the server returns it immediately
- Browser adds this piece of information to the DOM
Backend
The backend will proceed in 2 steps:
- A POST endpoint that will receive the message, and return nothing
- A GET endpoint that will read a queue and produce an output stream.
In our demo, to begin with, we will create a fake LLM response by repeating the user input, meaning that the words of the stream will be exactly the same as the user input.
To keep things clean, we need to separate the message streams (the queues) by user session, otherwise we would end up mixing up conversations. We will therefore create a session dictionary to host our queues.
Next, we need to tell the backend to wait before the queue is filled before streaming our response. If we don’t, we will encounter concurrency run or timing issues: SSE starts on client side, queue is empty, SSE closes, user inputs a message but…it’s too late!
The solution: async queues! Using asynchronous queues has several advantages:
- If queue has data: Returns immediately
- If queue is empty: Suspends execution until queue.put() is called
- Multiple consumers: Each gets their own data
- Thread-safe: No race conditions
Here is the code below:
from fastapi import FastAPI, Request, Form
from fastapi.templating import Jinja2Templates
from fastapi.responses import HTMLResponse, StreamingResponse
import asyncio
import time
import uuid

app = FastAPI()
templates = Jinja2Templates("templates")

# This object will store session id and their corresponding value, an async queue.
sessions = dict()

@app.get("/")
async def root(request: Request):
    session_id = str(uuid.uuid4())
    sessions[session_id] = asyncio.Queue()
    return templates.TemplateResponse(request, "index.html", context={"session_id": session_id})

@app.post("/chat")
async def chat(request: Request, query: str=Form(...), session_id: str=Form(...)):
    """ Send message to session-based queue """

    # Create the session if it does not exist
    if session_id not in sessions:
        sessions[session_id] = asyncio.Queue()

    # Put the message in the queue
    await sessions[session_id].put(query)

    return {"status": "queued", "session_id": session_id}

@app.get("/stream/{session_id}")
async def stream(session_id: str):

    async def response_stream():

        if session_id not in sessions:
            print(f"Session {session_id} not found!")
            return

        queue = sessions[session_id]

        # This BLOCKS until data arrives
        print(f"Waiting for message in session {session_id}")
        data = await queue.get()
        print(f"Got message: {data}")

        message = ""
        await asyncio.sleep(1)
        for token in data.replace("\n", " ").split(" "):
            message += token + " "
            data = f"""data: <li class='mb-6 ml-[20%]'> <div class='font-bold text-right'>AI</div><div>{message}</div></li>\n\n"""
            yield data
            await asyncio.sleep(0.03)

        queue.task_done()

    return StreamingResponse(response_stream(), media_type="text/event-stream")
Let’s explain a couple of key concepts here.
Session isolation
It is important that each user gets their own message queue, so as not to mix up conversations. We will handle that by using a sessions dictionary.
Note: For this demo, we store sessions in a global dictionary. In production, we would use Redis or a database, otherwise, our server memory will fill up indefinitely.
In the code below, we see that a new session id is created on page load, and stored in the sessions dictionary. Reloading the page will start a new session, we are not persisting the message queues but we could via a database for example.
# This object will store session id and their corresponding value, an async queue.
sessions = dict()

@app.get("/")
async def root(request: Request):
    session_id = str(uuid.uuid4())
    sessions[session_id] = asyncio.Queue()
    return templates.TemplateResponse(request, "index.html", context={"session_id": session_id})
Blocking coordination
We need to control the order in which SSE are sent and the user query is received. The order is, on the backend side:
- Receive user message
- Create a message queue and populate it
- Send messages from the queue in a Streaming Response
Failure to do so may lead to unwanted behavior, ie. first reading the (empty) message queue, then populating it with the user’s query.
The solution to control the order is to use asyncio.Queue. This object will be used twice:
- When we insert new messages in the queue. Inserting messages will “wake up” the polling in the SSE endpoint
await sessions[session_id].put(query)
- When we pull messages from the queue. In this line, the code is blocked until a signal from the queue arrives saying “hey, i have new data!”:
data = await queue.get()
This pattern offers several advantages:
- Each user has its own queue
- There is no risk of race conditions
Streaming simulation
Before plugging a real LLM, we will simulate a LLM response by splitting the user’s query in words and return those words one by one.
The streaming is handled via the StreamingResponse object from FastAPI. This object expects an asynchronous generator that will yield data until the generator is over. We have to use the yield keyword instead of the return keyword, otherwise our generator would just stop after the first iteration.
Let’s decompose our streaming function:
- First, we need to ensure we have a queue for the current session from which we will pull messages:
if session_id not in sessions:
    print(f"Session {session_id} not found!")
    return

queue = sessions[session_id]
- Next, once we have the queue, we will pull messages from the queue if it contains any, otherwise the code pauses and waits for messages to arrive. This is the most important part of our function:
# This BLOCKS until data arrives
print(f"Waiting for message in session {session_id}")
data = await queue.get()
print(f"Got message: {data}")
To simulate a stream, we will now chunk the message in words (called tokens here), and add some time sleeps to simulate the text generation process from a LLM (the asyncio.sleep parts). Notice how the data we yield is actually HTML strings, encapsulated in strings starting with “data:”. This is how SSE messages are sent. You can also choose to flag your messages with the “event:” metadata. An example would be:
event: my_custom_event
data: <div>Content to swap into your HTML page.</div>
Let’s see how we implement it in Python (for the purists, use Jinja templates to render the HTML instead of a string:) ):
message = ""

# First pause to let the browser display "Thinking when the message is sent"
await asyncio.sleep(1)

# Simulate streaming by splitting message in words
for token in data.replace("\n", " ").split(" "):

    # We append tokens to the message
    message += token + " "

    # We wrap the message in HTML tags with the "data" metadata
    data = f"""data: <li class='mb-6 ml-[20%]'><div class='font-bold text-right'>AI</div><div>{message}</div></li>\n\n"""
    yield data

    # Pause to simulate the LLM generation process
    await asyncio.sleep(0.03)

queue.task_done()
Frontend
Our frontend has 2 jobs: send user queries to the backend, and listen for SSE message on a specific channel (the session_id). To do that, we apply a concept called “Separation of concepts”, meaning each HTMX element is responsible for a single job only.
- the form sends a user input
- the SSE listener handles the streaming
- the
- chat displays the message
To send messages, we will use a standard textarea input in a form. The HTMX magic is just below:
<form
    id="userInput"
    class="flex max-h-16 gap-4"
    hx-post="/chat"
    hx-swap="none"
    hx-trigger="click from:#submitButton"
    hx-on::before-request="
        htmx.find('#chat').innerHTML += `<li class='mb-6 justify-start max-w-[80%]'><div class='font-bold'>Me</div><div>${htmx.find('#query').value}</div></li>`;
        htmx.find('#chat').innerHTML += `<li class='mb-6 ml-[20%]'><div class='font-bold text-right'>AI</div><div class='text-right'>Thinking...</div></li>`;
        htmx.find('#query').value = '';
    "
>
    <textarea
        id="query"
        name="query"
        class="flex w-full rounded-md border border-input bg-transparent px-3 py-2 text-sm shadow-sm placeholder:text-muted-foreground focus-visible:outline-none focus-visible:ring-1 focus-visible:ring-ring disabled:cursor-not-allowed disabled:opacity-50 min-h-[44px] max-h-[200px]"
        placeholder="Write a message..."
        rows="4"></textarea>
    <button
        type="submit"
        id="submitButton"
        class="inline-flex max-h-16 items-center justify-center rounded-md bg-neutral-950 px-6 font-medium text-neutral-50 transition active:scale-110"
    >Sends</button>
</form>
If you remember the sections above, we have several HTMX attributes which deserve explanations:
hx-post: The endpoint the form data will be submitted.hx-swap: Set to none, because in our case the endpoint does not return any data.hx-trigger: Specifies which event will trigger the requesthx-on::before-request: A very light part with javascript to add some snappiness to the app. We will append the user’s request to the list in the chat, and display a “Thinking” message to the user while we are waiting for the SSE messages to stream. This is nicer that having to stare at a blank page.
It is worth nothing that we actually send 2 parameters to the backend: the user’s input and the session id. This way, the message will be inserted in the right queue on the backend side.
Then, we define another component that is specifically dedicated to listening to SSE messages.
<!-- Messages will be added to this list-->
<div class="mb-auto max-h-[80%] overflow-auto">
    <ul id="chat" class="rounded-2xl p-4 mb-16 justify-start">
    </ul>
</div>

<!-- SSE listened (message buffer)-->
<div
    hx-ext="sse"
    sse-connect="/stream/{{ session_id }}"
    sse-swap="message"
    hx-swap="outerHTML scroll:bottom"
    hx-target="#chat>li:last-child"
    style="display: none;"
></div>
This component will listen to the /stream endpoint and pass its session id to listen for messages for this session only. The hx-target tells the browser to add the data to the last li element of the chat. The hx-swap specifies that the data is actually meant to replace the entire current li element. This is how our streaming effect will work: replacing current message with the latest one.
Note: other methods could have been used to replace specific elements of the DOM, such as out-of-band (OOB) swaps. They work a little bit differently since they require a specific id to look for in the DOM. In our case, we chose on purpose not to assign ids to each written list elements.
An Agentic Chatbot using Google Agent Development Kit
Now is the time to replace our dummy streaming endpoint with a real LLM. To achieve that, we will build an agent using Google ADK, equipped with tools and memory to fetch information and remember conversation details.
A very short introduction to agents
You probably already know what a LLM is, at least I assume you do. The main drawback of LLMs as of today is that LLMs alone cannot access real time information: their knowledge is frozen at the moment they were trained. The other drawback is their inability to access information that is outside their training scope (eg, your company’s internal data),
Agents are a type of AI applications that can reason, act and observe. The reasoning part is handled by the LLM, the “brain”. The “hands” of the agents are what we call “tools”, and can take several forms:
- a Python function, for example to fetch an API
- a MCP server, which is a standard that allows agents to connect to APIs through a standardized interface (eg accessing all the Gsuite tools without having to write yourself the API connectors)
- other agents (in that case, this pattern is called agent delegation were a router or master agents controls different sub-agents)
In our demo, to make things very simple, we will use a very simple agent that can use one tool: Google Search. This will allow us to get fresh information and ensure it is reliable (at least we hope that the Google Search results are…)
In the Google ADK world, agents need basic information:
- name and description, for documentation purposes mostly
- instructions: the prompt that defines the behavior of the agent (tools use, output format, steps to follow, etc)
- tools: the functions / MCP servers / agents the agent can use to fulfill its objective
There are also other concepts around memory and session management, but that are out of scope.
Without further ado, let’s define our agent!
A Streaming Google Search Agent
from google.adk.agents import Agent
from google.adk.agents.run_config import RunConfig, StreamingMode
from google.adk.runners import Runner
from google.adk.sessions import InMemorySessionService
from google.genai import types
from google.adk.tools import google_search

# Define constants for the agent
APP_NAME = "default"  # Application
USER_ID = "default"  # User
SESSION = "default"  # Session
MODEL_NAME = "gemini-2.5-flash-lite"

# Step 1: Create the LLM Agent
root_agent = Agent(
    model=MODEL_NAME,
    name="text_chat_bot",
    description="A text chatbot",
    instruction="You are a helpful assistant. Your goal is to answer questions based on your knowledge. Use your Google Search tool to provide the latest and most accurate information",
    tools=[google_search]
)

# Step 2: Set up Session Management
# InMemorySessionService stores conversations in RAM (temporary)
session_service = InMemorySessionService()

# Step 3: Create the Runner
runner = Runner(agent=root_agent, app_name=APP_NAME, session_service=session_service)
The Runnerobject acts as the orchestrator between you and the agent.
Next, we (re)define our /stream endpoint. We first check the session for the agent exists, otherwise we create it:
# Attempt to create a new session or retrieve an existing one
try:
    session = await session_service.create_session(
        app_name=APP_NAME, user_id=USER_ID, session_id=session_id
    )
except:
    session = await session_service.get_session(
        app_name=APP_NAME, user_id=USER_ID, session_id=session_id
    )
Then, we take the user query, pass it to the agent in an async fashion to get a stream back:
# Convert the query string to the ADK Content format
query = types.Content(role="user", parts=[types.Part(text=query)])

# Stream the agent's response asynchronously
async for event in runner.run_async(
    user_id=USER_ID, session_id=session.id, new_message=query, run_config=RunConfig(streaming_mode=StreamingMode.SSE)
):
There is a trap next : when generating a response, the agent might output a double linebreak “\n\n”. This is problematic because in the SSE protocol, two consecutive newlines \n\n signal the end of an event. Having a double linebreak in your string therefore means:
- your current message will be truncated
- your next message will be incorrectly formatted and the SSE stream will stop
You can try it by yourself. To fix this, we will use a little hack, along with another little hack to format list elements (I use Tailwind CSS which overrides certain CSS rules). The hack is:
if event.partial:
    message += event.content.parts[0].text

    # Hack here
    html_content = markdown.markdown(message, extensions=['fenced_code']).replace("\n", "<br/>").replace("<li>", "<li class='ml-4'>").replace("<ul>", "<ul class='list-disc'>")

    full_html = f"""data: <li class='mb-6 ml-[20%]'> <div class='font-bold text-right'>AI</div><div>{html_content}</div></li>\n\n"""

    yield full_html
This way, we ensure that no double linebreaks will break our SSE stream.
Full code for the route is below:
@app.get("/stream/{session_id}")
async def stream(session_id: str):

    async def response_stream():

        if session_id not in sessions:
            print(f"Session {session_id} not found!")
            return

        # Attempt to create a new session or retrieve an existing one
        try:
            session = await session_service.create_session(
                app_name=APP_NAME, user_id=USER_ID, session_id=session_id
            )
        except:
            session = await session_service.get_session(
                app_name=APP_NAME, user_id=USER_ID, session_id=session_id
            )

        queue = sessions[session_id]

        # This BLOCKS until data arrives
        print(f"Waiting for message in session {session_id}")
        query = await queue.get()
        print(f"Got message: {query}")

        message = ""

        # Convert the query string to the ADK Content format
        query = types.Content(role="user", parts=[types.Part(text=query)])

        # Stream the agent's response asynchronously
        async for event in runner.run_async(
            user_id=USER_ID, session_id=session.id, new_message=query, run_config=RunConfig(streaming_mode=StreamingMode.SSE)
        ):
            if event.partial:
                message += event.content.parts[0].text

                html_content = markdown.markdown(message, extensions=['fenced_code']).replace("\n", "<br/>").replace("<li>", "<li class='ml-4'>").replace("<ul>", "<ul class='list-disc'>")

                full_html = f"""data: <li class='mb-6 ml-[20%]'> <div class='font-bold text-right'>AI</div><div>{html_content}</div></li>\n\n"""

                yield full_html

        queue.task_done()

    return StreamingResponse(response_stream(), media_type="text/event-stream")And that’s it! You will be able to converse with your chat!
And that’s it! You will be able to converse with your chat!
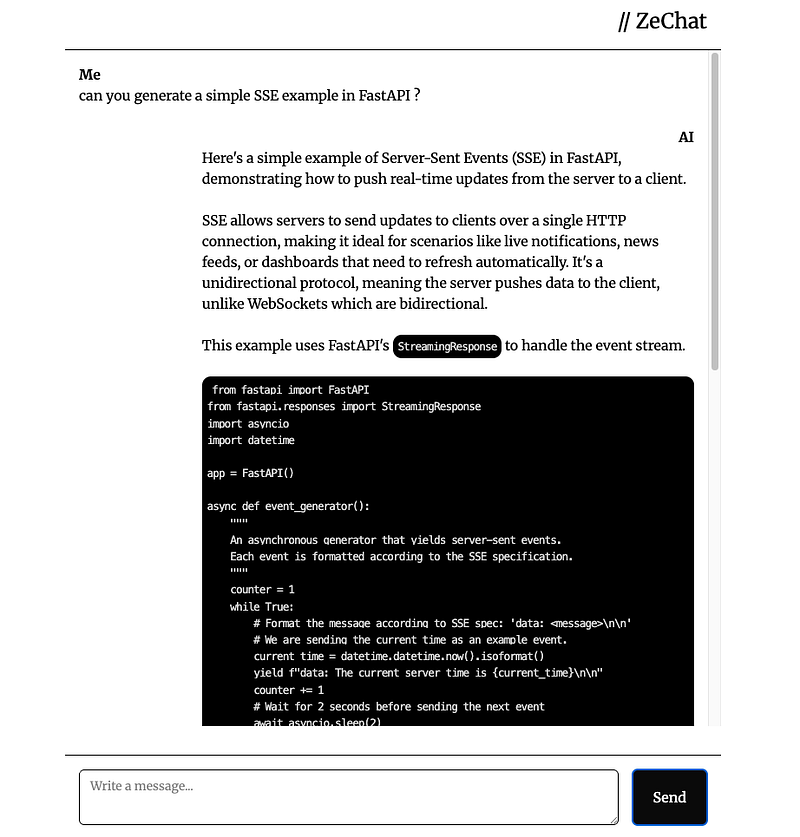
Bonus : Below is a little CSS snippet to format code blocks to format code snippets provided by the LLM. Here is the HTML:
pre, code {
      background-color: black;
      color: lightgrey;
      padding: 1%;
      border-radius: 10px;
      white-space: pre-wrap;
      font-size: 0.8rem;
      letter-spacing: -1px;
    }
And here is what the formatted code snippets will look like:
Conclusion
With less that 200 LoC, we were able to write a chat with the following worflow, stream a response from the server and display it very nicely by playing with SSE and HTMX.
Above all, we showed how easy it could be to develop a chatbot app with very little vanilla javascript and mostly, without heavy JS frameworks, just by using Python and HTML. We covered topics such as
- Server-Side Rendering
- Server-sent Events (SSE)
- Asynchronous streaming
- Agents
with the help of a magical library, HTMX.
The main purpose of this article was also to show that the world of web applications is not inaccessible to non-Javascript developers ! There is actually a very strong and valid reason not to use Javascript frameworks everytime for web development, and although Javascript is a powerful language, my feeling today is that it is sometimes overused in place of simpler, yet robust approaches. The server-side vs client-side applications debate is long-standing and not over yet, but I hope this reading may act as an eye-opener to some of you and open new perspectives.
Find out more on https://htmx.org/
Happy coding.